|
|
|
Why Dual Pass?
The Dual Pass Encoder Mode is the preferred method for preparing video footage for streaming or for any other scenario where you need to maintain an average or constant bitrate. It is much more accurate in maintaing a data rate and will give you a more constant quality level compared to the Single Pass Constant and Variable Bitrate Encodes Modes.
There are only a small number of applications for Mac OS X that take advantage of 3ivx's Dual Pass Encoder Mode. Although Cleaner does not have such native support, this guide will show a work-around.
What is Cleaner?
Autodesk Cleaner 6 is a popular media processing application with video professionals to batch encode a wide variety of audio and video formats. Although the application can use some maintanence and has been superceded by others in certain areas, it still does a good job.
Before you start
Before you start to encode, make sure your source footage is properly recognised by Cleaner. Although Cleaner supports a wide variety of formats, it is not perfect and some files may need to be converted before you can process them.
|
|
|
|
Step 1 - Import your video
Add your source footage twice to the Batch window. You can drag the video to the Batch window or you can choose Batch -> Add Files... in the menu.
We need to have two copies of the same video in order to be able to do the two passes of the Dual Pass Encoder Mode.
|
|
|
Step 2 - First Pass - Configure Cleaner
Double click in the settings column of the Batch window to change the settings for the first file.
You can create your own setting template by clicking on the 'New Setting' button or you can download the ones I used here.
Both for the First and for the Second Pass the settings in the Image and Adjust tabs should be identical. Besides that, feel free to configure them to your needs. For the sake of convenience, I will uncheck everything in the Image and Adjust tabs.
For the First Pass make sure all but the Video Track in the Tracks tab are disabled (see screenshot).
Check that the format in the Output tab is set to QuickTime.
|
|
|
Step 3 - First Pass - Configure 3ivx
Go to the Encode tab and choose 3ivx MPEG-4 5.0.4as the Codec.
Configure the Frame Rate as desired. Avoid using Same as source as this might cause problems with the accuracy of the data rate.
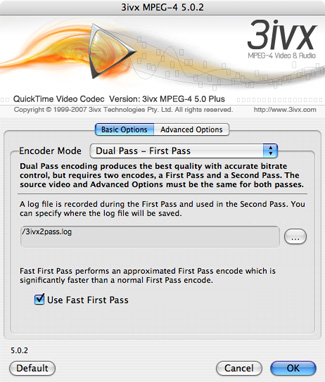
Set the Video Data Rate, enable the Options and click on Set... to start configuring 3ivx.
Configure the Advanced Settings as desired. More information about the Advanced Settings is available here.
Set the Encoder Mode to Dual Pass - First Pass (see screenshot).
Click 'OK', click 'Apply'.
|
|
|
Step 4 - Second Pass - Configure Cleaner
Double click in the settings column of the Batch window to change the settings for the second file.
You can create your own setting template by clicking on the 'New Setting' button or you can download the ones I used here.
Configure the settings in the Image and Adjust tabs identical to how you configured them for the First Pass.
For the Second Pass you can enable both the Video and the Audio Track in the Tracks tab (see screenshot).
Check that the format in the Output tab is set to QuickTime.
|

|
|
Step 5 - Second Pass - Configure 3ivx
Go to the Encode tab and choose 3ivx D4 4.5.1 as the Codec.
Configure the Frame Rate and the Video Data Rate identical to how you configured them in the First Pass.
Enable the Options and click on Set... to start configuring 3ivx.
Configure the Advanced Settings identical to how you configured them in the First Pass.
Set the Encoder Mode to Dual Pass - Second Pass (see screenshot). Configure the Dual Pass Goal and Frame Suppression as desired. More information about these settings is available here.
Click 'OK', click 'Apply'.
|
|
|
Step 6 - Start the Encode
Cleaner will first Encode the topmost file in the list. It is important that the First Pass is processed before the Second Pass. If your Batch list is in the wrong order, you can change the order by clicking the Setting header once or twice.
To start encoding click the green play button.
A progress window will appear and if all goes well you will end up with a Dual Pass encoded QuickTime Movie.
|